![oxfordrisk.zendesk.comhctheming_assets01HZPK08F39VSQFMWBN7WG19VM.png]](https://help-centre.oxfordrisk.com/hs-fs/hubfs/social-suggested-images/oxfordrisk.zendesk.comhctheming_assets01HZPK08F39VSQFMWBN7WG19VM.png?height=40&name=oxfordrisk.zendesk.comhctheming_assets01HZPK08F39VSQFMWBN7WG19VM.png)
This guide is intended for admin users. This is a very detailed explanation of every part of the site that you, as an admin, have access to.
- Landing page/Clients page
- Your account
- Settings
- Users and Groups
- Help
-
- Privacy and data:
- Log out
Landing page
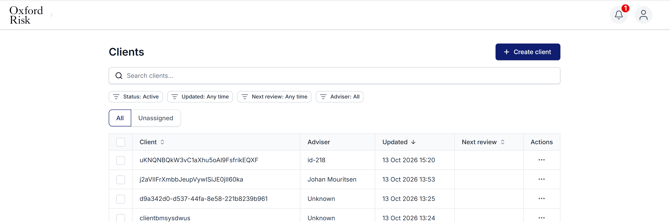
The landing page is now your Clients page, showing all the clients whose profiles you have access to. Here, you can create a client, search for a particular client or use one of the filters shown to see a subset of your list.
You can also make certain bulk edits to clients, such as archiving/deleting them or reassigning them to another adviser, by selecting the clients you wish to edit as shown below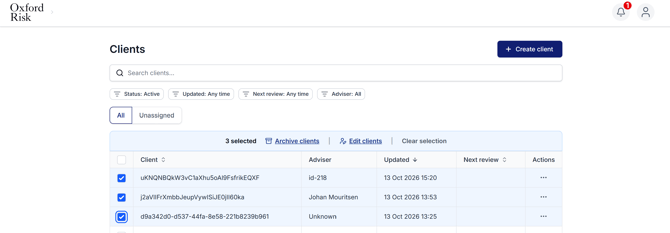
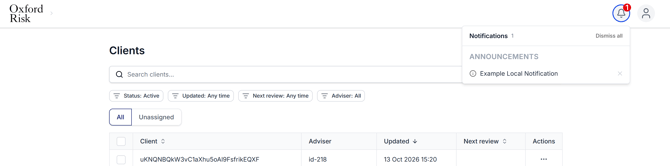
Notifications can be viewed by clicking the bell in the top right corner of any page. Here, you can see announcements such as when a client completes a questionnaire
Your account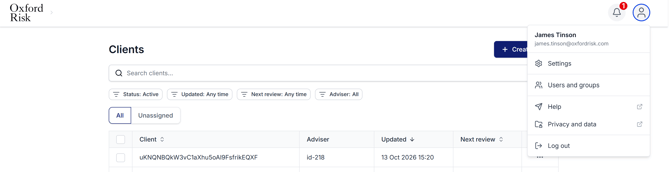
This is the section where you can find you can manage users, customize the site and manage your personal information. Click on the icon in the top right corner to view the options.
- Settings: This section is divided into 4 parts:
- Your details: Here you can update your personal information (first name, last name and email) and change your password. New passwords must be at least 8 characters and include a mix of upper and lowercase letters, numbers and symbols. Click Save to apply your changes.
- Email notifications: Choose how often you’d like email updates about your clients’ activity. There are 3 options:
- Don’t send me emails
- Send me an email for each client update
- Send me a daily digest
- Appearance: Here you can customise how your company site looks and feels. You can:
- Logo: Upload your main logo and a separate loading-screen logo (PNG, JPG or SVG, up to 2 MB each).
- Colours: Choose the colours used across reports and the client portal: Primary, Secondary text, and the chart colours for Low, Mid and High.
- Currency: Set the default currency for monetary values (GBP, USD, EUR, CHF, JPY, AUD or CAD).
- Security & Privacy: There are 2 settings you can configure here:
- Single Sign-On (SSO): Let your users sign in with your own identity provider over SAML 2.0. Once SSO is enabled, advisers are redirected to your identity provider to sign in. A setup guide is linked from this section.
- Client data fields: Choose which client information is collected. You can turn off client personal information collection entirely, and then no client data fields are stored. For each field (e.g. Title, First name, Last name, Known As, Reference or ID, Email, Date of birth, Country of Residence), you can:
- Use the Active toggle to show or hide it
- Tick Clients can edit to let clients update it themselves
- Click Add new field to create your own custom fields
-
Users and Groups: This is where you create and manage the users and groups on your site. The menu on the left has 4 sections: Advisers, Assistants, Admins and Groups.
- Advisers, Assistants and Admins: Each of these pages lists every user of that type. All three work the same way:
- Use the Create button at the top (e.g. Create Adviser) to create a new user.
- Search users by name or email. Use the filter to show Active, Archived or All users.
- Sort the list by name, last login or date created. Users who haven’t accepted their invitation yet are marked Invited.
- Click a user to see their options:
- Edit details: Update their user type, name, email, phone, office location, status (Active or Archived) and which groups they belong to. Setting the status to Archived is how you archive or reactivate a user.
- Reset password: Send the user a “reset password” email.
- Send invitation: Send the user their invitation to log in to the site.
- Linking advisers and assistants: When you edit an assistant, the Advisers this assistant supports field lets you link an assistant to one or more advisers.
- Groups: Here you can view, create and archive groups.
- Click Create Group to add a new group. Give it a name, and optionally an abbreviation and a colour.
- Click View on a group to open it. From there you can:
- Rename the group using the pencil icon
- See its Members and filter by role (all roles, advisers only or assistants only)
- Click Add member to add advisers or assistants to the group
- Tick Allow advisers to view each other’s clients to let advisers in the group see each other’s clients
- See the Clients belonging to the group
- Click Archive to archive a group you no longer need.
- For more information about groups, please refer to this article.
- Advisers, Assistants and Admins: Each of these pages lists every user of that type. All three work the same way:
- Help: This takes you to our Help Centre, where this article and many other useful resources reside
- Privacy and data: Our Privacy Notice
- Log out